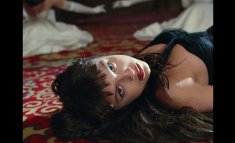

Cinemagraphs might be my favorite "new" music video effect, presenting the viewer with a mostly still image that has an isolated spot of motion.
Director Chris Grieder uses the technique in this new Kelsi Luck video, and was kind enough to break down the process for those interested in using it. It's a complicated and time-intensive process, and Chris' instructions are definitely aimed at those with a working knowledge of 3k/FPS/XML/AE/TIFF and other letters, so be prepared to go full nerd.
Chris Grieder, director: We shot on a RED Scarlet — mainly at 3k resolution so we could shoot 48fps, but some stuff was shot 4k/24fps. We tried to make wider compositions full of detail, closer to still photograph compositions, rather than typical music video comps. We then transcoded footage to ProRes for an initial layout edit. I cut that together, just using the fully moving video clips for each shot. Then, once a layout edit was locked, we used an XML generated from that edit to render each shot out as 3k TIFF sequences. We figured out the best frame to use as a "frozen" still plate and then I photoshopped those images. I would burn, dodge, sharpen, and sometimes add subtle dirt and scratches, to make it look more like a printed photograph.
Sometimes I combined multiple frames to create the perfect plate where all elements were the way we wanted them. A perfect example: I combined different passes to remove reflectors and an additional car Kelsi was actually standing on instead of the picture car. The owner of the car wouldn't let Kelsi stand on the roof, because it was old and flimsy. The solution was to pull up DP Chris Ripley's car directly behind it, have her stand on that roof, and frame it to look as if she was on the picture car. Then in photoshop we erased the actual car she was standing on. We then shot a pass of water splashing on a counter top, to composite in the shot as she pours the gas, making it appear the gas is splashing on the roof.
We imported the layered photoshop files into After Effects, preserving the layer structure so certain aspects of the photoshop files could continue to be tweaked if necessary. Then Chris Ripley created a different AE composition for each shot. Then he brought in each shot's full TIFF sequence into its respective composition and used a traveling matte to composite in the moving parts. Different shots required different tricks. Sometimes he would have to motion track part of Kelsi in order to make sure things stayed in the same place and didn't break off from the rest of her body as it moved. Other shots, he would end up warping the motion layer with a mesh, in order to make sure that, say, the stream of gas always came from the same rigid point in space, even though in the raw footage the spout of the gas can was moving around. Sometimes he had to move or change objects in order to marry the moving and still worlds. In the shot with gas flowing down the window, the static dice were enlarged slightly to cover the fact that the dice in the motion clip were moving slightly and impossible to freeze, due to a background that was fully in motion. In one of the gas pouring shots, he actually had to transplant the gas can's nozzle slightly in order to make it fit with where the gas stream was coming from and simultaneously maintain the best still frame for Kelsi's position.
In the case of the lighter closeups where everything but the flame was static, he actually had to track the lighter and pin it to one spot, since her hand was shaking slightly. But that caused the background behind the flame to move around, showing the seams in the composite! Avoiding that would require an insanely tight, clean roto to the flame. Instead, he was able to use a luma key, since the flame was the lightest object in that area of the frame.The scorpion logo was also tracked to the lighter since we didn't have that piece of art on the day.
After Chris Ripley finished each composited shot, he rendered it out from After Effects as a 1080p ProRes 4444 file, which we then graded in DaVinci Resolve for a dingy, slightly creepy photographic look. Then, I brought the shots back into FCP, subbed the shots in for the original layout edit, and added some time reversing effects that were requested by the artist. We then added the zooms and dutch tilts by keyframing from the motion tab in FCP, and that was that!


Comments